Before someone clicks your video, they see your thumbnail. That's it. No title. No description. Just a small image that has to do a big job in under two seconds.
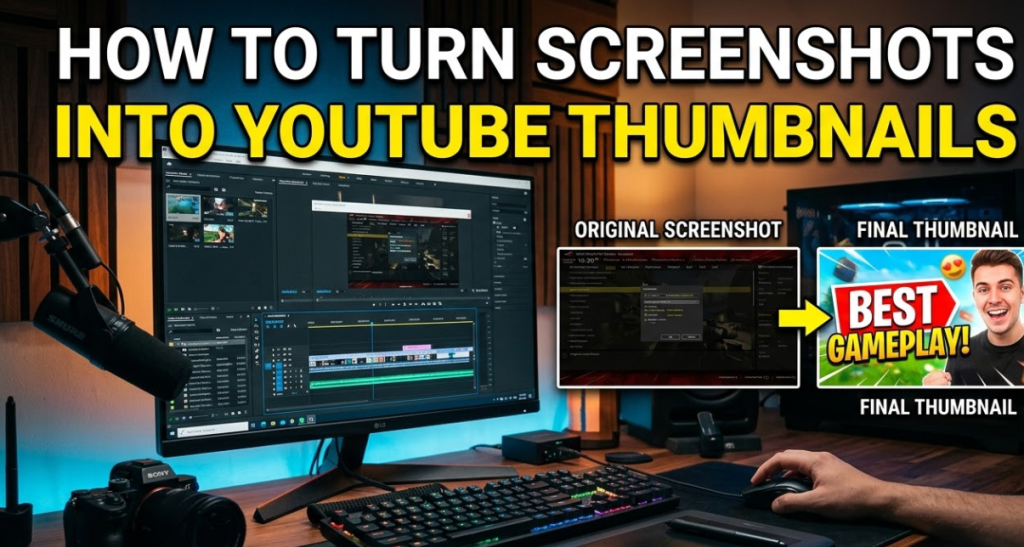
Turning screenshots into YouTube thumbnails is one of the smartest, fastest ways to create click-worthy images — especially if you're a gamer, educator, reaction creator, or anyone who records their screen. You already have the footage. You already have the moment. Now you just need to frame it right.
This guide walks you through everything — from capturing the perfect screenshot to exporting a polished thumbnail that actually gets clicks. No design degree needed. No expensive software required.
What Makes a YouTube Thumbnail Actually Work
Before jumping into tools and steps, it helps to know what separates a great thumbnail from a forgettable one.
The Three Rules of High-Click Thumbnails
1. Contrast grabs attention. Bright colors on dark backgrounds (or vice versa) pop in a crowded feed. If your screenshot is dull, you'll fix that during editing.
2. Faces and emotions drive clicks. Research from YouTube itself shows thumbnails with expressive human faces outperform those without. If your screenshot includes a face, center it.
3. Text should be short and punchy. Three to five words max. Viewers scan thumbnails in less than a second. Big, bold text wins.
The Right Screenshot to Use as a YouTube Thumbnail Base
Not every screenshot will work. Some are blurry. Some are boring. Some just don't translate well to a thumbnail.
What to Look For in a Thumbnail-Worthy Screenshot
Here's a quick checklist:
| Feature | Why It Matters |
|---|---|
| High resolution (1280×720 or higher) | Thumbnails look sharp on all screens |
| Strong focal point | Viewer's eye knows where to look |
| Expressive moment or action | Creates curiosity or emotion |
| Minimal clutter or distractions | Clean composition = faster understanding |
| Good lighting or contrast | Dark or washed-out images look amateurish |
If your screenshot doesn't have most of these, keep looking. The right base image makes editing ten times easier.
Best Types of Screenshots for Thumbnails
- Gaming: Capture an intense moment — a kill shot, a boss fight, or a jaw-drop reaction.
- Tutorials: Grab a clear before-and-after or a step that shows visible transformation.
- Vlogs/Face Cams: Find a frame where your face shows genuine emotion.
- Software Reviews: Pick a clean, well-lit screen showing the product in action.
- Reaction Videos: The more exaggerated the expression, the better it performs.
How to Capture the Best Screenshot for Your Thumbnail
Getting a high-quality screenshot is step one. Here's how to do it on every major platform.
On Windows
- Snipping Tool (built-in): Press
Windows + Shift + Sto snip any part of your screen. - Print Screen (PrtSc): Captures the full screen and saves to clipboard.
- Xbox Game Bar: Press
Windows + Gduring gameplay, then click the camera icon.
On Mac
Command + Shift + 4: Drag to select a custom area.Command + Shift + 3: Full-screen capture.- Both save directly to your desktop as PNG files.
On Mobile (iOS / Android)
- iPhone: Press Side Button + Volume Up simultaneously.
- Android: Press Power + Volume Down at the same time.
- Screenshots save to your Photos/Gallery app automatically.
From Video Footage
If you're editing in a video editor like DaVinci Resolve, Premiere Pro, or CapCut, you can export a single frame directly. This often gives you the cleanest image since it's already at your video's resolution.
Tools to Turn Screenshots Into YouTube Thumbnails
Now the fun part. Here are the best tools — free and paid — to transform a raw screenshot into a polished thumbnail.
Free Tools
1. Canva (canva.com) One of the most beginner-friendly tools available. Canva has a built-in YouTube thumbnail template (1280×720 px). You upload your screenshot, drop it into the template, and customize with text, stickers, and effects.
2. Canvix Canvix is a fast, purpose-built thumbnail creator that makes editing screenshots quick and visual. It's especially useful if you want a clean, professional result without going through heavy design software. Perfect for creators who want speed and quality in one place.
3. Adobe Express (express.adobe.com) Adobe's free version is surprisingly powerful. It includes background removal, text effects, and template packs made for YouTube.
4. GIMP Free and open-source. It takes some learning, but GIMP gives you full control over layers, colors, and effects — similar to Photoshop.
5. Snapseed (Mobile) Google's free mobile editor. Great for color correction, sharpening, and quick fixes on phone screenshots.
Paid / Pro Tools
6. Adobe Photoshop The industry standard. Best for detailed edits, advanced background removal, and high-quality text effects. If you create thumbnails daily, it's worth the subscription.
7. Photopea (photopea.com) Technically free, but deserves a special mention. It runs entirely in a browser and mimics Photoshop almost exactly. No download required.
Tool Comparison at a Glance
| Tool | Price | Skill Level | Best For |
|---|---|---|---|
| Canva | Free / Pro | Beginner | Templates and quick edits |
| Canvix | Free | Beginner–Intermediate | Fast thumbnail creation |
| Adobe Express | Free / Paid | Beginner | Visual effects and branding |
| GIMP | Free | Intermediate | Full editing control |
| Photopea | Free | Intermediate | Photoshop-style editing |
| Adobe Photoshop | Paid | Advanced | Professional-grade thumbnails |
| Snapseed | Free | Beginner | Mobile edits |
Step-by-Step: How to Turn a Screenshot Into a YouTube Thumbnail
Let's walk through the full process using Canva as the example. The same principles apply to any tool.
Step 1 — Set Up the Correct Canvas Size
YouTube's required thumbnail size is 1280 × 720 pixels at a minimum. The maximum file size is 2 MB, and the accepted formats are JPG, PNG, GIF, or BMP.
In Canva:
- Click "Create a design"
- Select "YouTube Thumbnail"
- Canva automatically sets the size to 1280×720 px
Step 2 — Upload Your Screenshot
Click "Uploads" on the left panel, then drag and drop your screenshot file. Once uploaded, click it to add it to your canvas.
Resize it to fill the canvas completely. Make sure the key focal point (a face, an object, an explosion — whatever it is) sits slightly left or center of the frame.
Step 3 — Enhance the Image Quality
Raw screenshots often look flat. Apply these quick fixes:
- Brightness/Contrast: Increase both slightly to add visual pop.
- Saturation: Boost by 10–20% to make colors richer.
- Sharpness: Add a small amount to tighten up any soft edges.
In Canva, click your image, then select "Edit image" to access these filters.
Step 4 — Remove or Replace the Background (Optional but Powerful)
If your screenshot has a messy or distracting background, remove it. Canva Pro, Adobe Express, and Canvix all offer one-click background removal.
Once removed, you can:
- Drop in a solid color background
- Use a gradient for visual depth
- Add a dramatic or themed scene behind your subject
This step instantly makes screenshots look professional — not just like a cropped frame.
Step 5 — Add Bold, Readable Text
This is where most creators lose clicks. Their text is too small, too thin, or too close to the edge.
Follow these rules:
- Font size: 80pt or higher for main text
- Font style: Bold or Extra Bold only
- Color: White or yellow with a dark shadow or stroke for readability
- Position: Upper half or lower third — never center (that's where the face/focal point lives)
- Word count: 3–5 words max
Strong example: "I Can't Believe This Worked" or "This Changes Everything"
Step 6 — Add Graphic Elements (Optional)
Simple additions that boost visual appeal:
- Arrow or circle: Draw the viewer's eye to a specific spot
- Emoji or sticker: Adds personality and emotion
- Logo or watermark: Builds brand recognition over time
- Color border or frame: Makes the thumbnail pop in the YouTube grid
Don't overdo it. Two or three elements are usually enough.
Step 7 — Export in the Right Format
Once your thumbnail looks good:
- Click "Download" in Canva
- Choose PNG for best quality (or JPG if file size is a concern)
- Make sure the file stays under 2 MB
Your screenshot-turned-thumbnail is ready to upload.
Uploading Your Thumbnail to YouTube
Once your file is ready, here's how to add it to your video:
- Go to YouTube Studio
- Click "Content" from the left sidebar
- Find the video you want to update and click the pencil (edit) icon
- Scroll down to the "Thumbnail" section
- Click "Upload thumbnail" and select your file
- Click "Save" in the upper right corner
That's it. YouTube usually updates the thumbnail within a few minutes.
Note: To upload custom thumbnails, your YouTube account must be verified. Verification is free and takes under two minutes via YouTube Studio settings.
Common Mistakes That Kill Thumbnail Performance
Even with a great screenshot and solid editing, small mistakes can tank your click-through rate. Here's what to avoid.
Mistake 1 — Using Low-Resolution Screenshots
If your screenshot is 640×360 or lower, it will look blurry on large screens and TVs. Always aim for 1280×720 or higher.
Mistake 2 — Too Much Text
Some creators pack four lines of text into a thumbnail. Viewers can't read it fast enough. Shorter text = more clicks.
Mistake 3 — Ignoring Mobile Viewers
Over 70% of YouTube views happen on mobile. A thumbnail that looks fine on desktop might be unreadable on a 5-inch screen. Always preview your thumbnail at a small size before uploading.
Mistake 4 — Not Testing Different Versions
YouTube allows you to switch thumbnails anytime. If your first thumbnail isn't performing, swap it with a different version. Test one change at a time — text, image, color — to find what works.
Mistake 5 — Blending Into the Competition
Before uploading, search for your video's topic on YouTube. Look at the thumbnails already ranking. Make yours look visually different — different colors, different layout — so it stands out in the feed.
Thumbnail Size and Format: Quick Reference Chart
| Spec | Requirement |
|---|---|
| Recommended Size | 1280 × 720 pixels |
| Minimum Width | 640 pixels |
| Aspect Ratio | 16:9 |
| Max File Size | 2 MB |
| Accepted Formats | JPG, PNG, GIF, BMP |
| Best Format for Quality | PNG |
| Best Format for Small File | JPG |
Pro Tips to Make Screenshot Thumbnails Look Cinematic
Want to go beyond basic? These tricks are used by top creators to make their thumbnails look like movie posters.
Use a Color Grade
Apply a cinematic color filter to your screenshot. Cool tones (blue-teal) feel dramatic. Warm tones (orange-red) feel exciting. Pick one that matches your video's mood.
Add a Subtle Vignette
A vignette darkens the edges of your image, naturally drawing the eye toward the center. Most editing tools have a vignette slider. Keep it subtle — around 20–30%.
Use Depth with Layers
Place your subject in the foreground, a secondary element in the middle ground, and a blurred background behind it. This layered approach creates visual depth, making screenshots look 3D instead of flat.
Match Your Brand Colors
If you post consistently, use the same text color or background style across all thumbnails. Viewers start recognizing your style in the feed — and that recognition builds trust and clicks over time.
You can also check out this Google guide on YouTube thumbnail best practices for platform-specific recommendations directly from YouTube.
FAQs: Screenshots Into YouTube Thumbnails
Q1: Can I use a screenshot directly as a YouTube thumbnail without editing? Yes, you technically can — but you probably shouldn't. Raw screenshots are often flat, unbranded, and lack the bold visual cues that drive clicks. A few minutes of editing makes a huge difference.
Q2: What's the best free tool to turn screenshots into YouTube thumbnails? Canva and Canvix are both excellent free options. Canva is great for beginners who want templates. Canvix is ideal if you want a fast, clean result without too many distractions.
Q3: Does screenshot quality affect the final thumbnail? Yes, a lot. Start with the highest-resolution screenshot you can get. Editing cannot fully fix a blurry or pixelated image.
Q4: How do I take a screenshot from a video for a thumbnail? Open the video in any video editor, pause on the frame you want, and export that frame as an image. In VLC, you can press Shift + S to capture a frame. In Premiere Pro, use the camera icon in the preview panel.
Q5: Can I use screenshots from other people's videos as thumbnails? No. Using screenshots from copyrighted videos without permission can lead to copyright claims or channel strikes. Always use your own footage.
Q6: How many times can I change a YouTube thumbnail? YouTube doesn't have a strict limit on thumbnail changes. You can update it as often as you like — which makes A/B testing easy.
Q7: What's the ideal text size for thumbnail text? On a 1280×720 canvas, aim for at least 80–100 pt for headline text. It should be readable even when the thumbnail is displayed at 168×94 px (the smallest size YouTube shows it).
Q8: Should I add my face to every thumbnail? Not necessarily. But if your screenshot includes a face showing strong emotion, always keep it visible. Emotional faces are one of the strongest click drivers on YouTube.
Conclusion: Your Screenshot Already Has What It Takes
You don't need a fancy camera or a graphic design background to create great YouTube thumbnails. The raw material is already inside your video — in every frame, every screenshot, every moment you captured.
The process of turning screenshots into YouTube thumbnails is simpler than most creators think: capture a strong frame, clean it up, add bold text, and export at the right size. Do that consistently, and your click-through rate will improve.
Start with one video. Take your best screenshot, open Canva or Canvix, and build your first custom thumbnail today. Once you see the difference it makes, you'll never skip this step again.
